
 Zahra Ardiany
 7 July 2000
 A Simple Geek^^
 Jakarta, Indonesia


1. Prepare your tools

You have to prepare your tools to start it. Start with preparing your pencil, ballpoint, paper, and you pen. There's steps of thickness in every pencil, like :
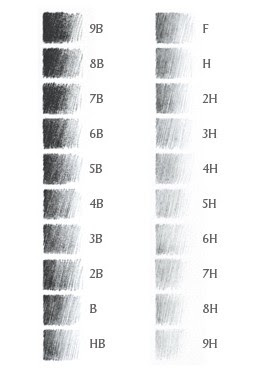
Every thickness is needed in drawing, like drawing a serious line in anime, making anime eyes, or coloring the anime hair, and so on. So, you might need some of these types of pencil thickness for every part of an anime body.
And the last part, prepare your erasers. Make sure that you clean them, because you don't want that your paper would get messy after you erase them. And if you ready, let's start.
Let's start to make the head.
2. Draw the head


Draw the circle and lines so that you know the places. Place at least two lines for the nose and the mouth. And then, make one line for the eyes and ears, because the eyes and ears or in the similar place. If you have
trouble of making the lines, you can just check it with your own face.
If you are done, then we continue to the eyes.
3. Draw the eyes
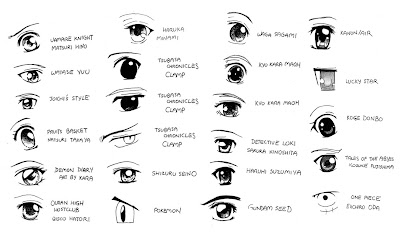
It's a bit of a challenge to make the eyes, but don't start giving up. This is a little step of how to make anime eyes.
The initial step in drawing the eye to draw a line starting from the upper limit of the eye, draw the shape of the eyebrow with a slight arch.

Then draw the eyes of the bottom boundary, the line length is shorter than the eye line and the top of a relatively straight line.

Draw a circle proportional eye conforms to the shape of the eye. For large eyes, the circle tend to elongate in the direction of the vertical.

Draw a small circle inside the circle eye to give the effect of reflected light received by the eye. So the more eyes look alive.

Complete the picture by adding eyelashes then scratched fine lines to give the eyelid and the eye black on the sphere. Add eyebrows also conform to the shape of his eyes.
Easy right? But, there's more tips more that this one, you can just click google.com and search for it! The eyes of a girl anime is bigger then a boy anime, but if you want to make a comic strip just for girls, just make the characters(guys or girls) similar. If your comics is just for guys, the eyes is more sharper. Remember, every emotions is performed with the different actions in the eyes.
If your character is happy or nice, place more light in the pupils. And if your character is fierce, angry, or mean, the pupils or more darker.
After you done, let's continue with the hair.
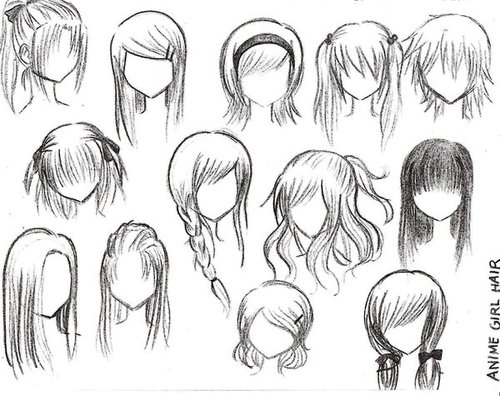
4. Draw the hair

Before the drawing board, to consider first the type of hair that will be drawn. For example, the type of hair straight, curly, wavy hair or random.
- Draw the male hair

Drawing male hair is relatively easier than drawing woman's hair, it is because men's hair is not too long, but usually in the picture there is also a manga man with long hair.

Do not exceed a pre-determined line, which really is like this.

Now, it looks more natural, right?

Now we will make the hair on the outside. Remember, this time line is a circle hairline cranium. As for the thickness of the hair, or hair zigzag models, follow the line thickness of hair that had been determined

The thickness of the neck for men are typically about the distance between the two eyes. But this is not a must, can sometimes wider and sometimes can be smaller too.

Clear the thin lines, give a little, and here it is!

You can draw an anime boy now! Stay practicing and you can make your own comic strips later!
- Draw the female hair

Anime female hair is usually unique and more challenging to draw. To beautify the appearance is usually added to braid hair or bangs on many forms. This is meniadi women more interesting to draw because of her beautiful hair.
Described here also when the hair in the wind, in this position to note the direction of the hair to be exposed to the wind direction of the movement of wind, this is done so that the hair a more natural character to be seen.
If you are done, let's begin to make the facial expressions.
5. Draw the facial expressions
Sad expressions shown with empty eyes and weak. Coupled with tears in her eyes like crying.
Image mouth curved downward.
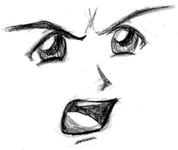
Angry expression demonstrated by juxtaposing the two eyebrows Spotlight sharp view and cold on the other. Coupled with wrinkles on the forehead, which reveal his anger. Shouted one angry form easily understood by most people.
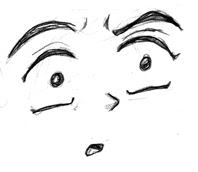
Happy expression was shown to raise both eyebrows. Figure eyes big and sparkling.
Image mouth like an inverted triangle or curved upward.
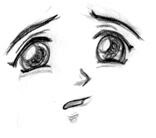
The picture on the side shows a surprised expression, it can be seen from the sphere eyes narrowed and described no effect of light from the eye sphere.
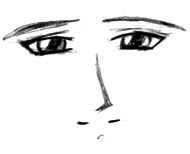
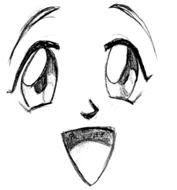
The picture on the side shows the facial expression calm, friendly or happy. It can be seen from the curved shape of the mouth are drawn down and the eyes are depicted normal.
Then, we continue with the hands.
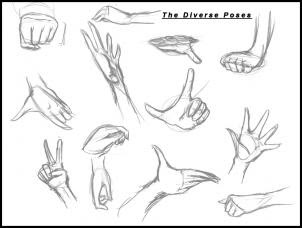
6. Draw the hands
To facilitate us in drawing, hand-drawn shape with a circle and an oval shape as the basis. Hand drawn shape will change, depending on the position from which we look. Therefore, it would be easier to describe the short cylinder resembling fingers, and also draw an oval shape for finger indentations.
To facilitate us in drawing , hand- drawn shape to the shape of ling
1 . The basic form of the hand

To draw hands , our hands were wrapped imagine , for example, our hands wrapped tight glove . Then drawing basic shapes formed by the hands and fingers . Next draw fine lines are used to indicate the position of the fingers .
2 . The shape of fingers

Note the shape of a finger from each other , and draw the finger with the appropriate size so that the size of the finger with one another more natural look . This point is most important to continue to the next step .
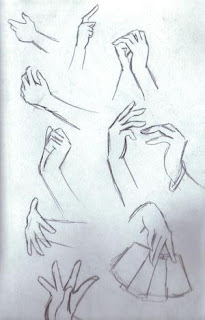
3 . Clarify the form of images

Draw the bending of the fingers , so finger images seen each other perfectly . Then remove the auxiliary lines and clear lines depicting the thumb and the palm of the hand .
4 . Give the shadow effect

To give a real impression , give subtle shading in the image . Thus the shape of the curve of the fingers and palm of the hand will look more real .
In this example illustrated hand shape is only partially visible .
To help us , draw your index finger first and then the others follow the finger picture or flush with the index finger . Draw in accordance with its proportion by providing help lines .
Tips :

karan and oval shape as the basis. Hand drawn shape will change , depending on the position from which we look. Therefore, it would be easier to describe the short cylinder resembling fingers , and also draw an oval shape for finger indentations.
Maybe that's it. Thank you for reading and never forget, that you can draw to, keep trying!! Arigatou~
ZAHRA


0 comments^^:
Posting Komentar